Showing posts with label real food recipes. Show all posts

Tuesday, August 20, 2013

Pancetta Wrapped Stuffed Chicken

Pancetta Wrapped Stuffed Chicken

Last night I was going to make bruschetta chicken. But then I realized that it was pretty much the same thing as the bruschetta salmon, and that wasn't really blog-worthy. So I challenged myself to come up with something different, and this is that something.

Fortunately, a friend got me a meat tenderizer over the weekend (after I made an offhand comment that I still didn't have one... how sweet), so I just pounded out the chicken breasts, stuffed them with spinach and parmesan, and wrapped them in some leftover pancetta. Bam.

Ingredients

4 thin sliced chicken breasts
8 cups spinach
1/2 cup shredded parmesan (give or take)
4 slices pancetta (or bacon)
salt and pepper to taste

Directions:

1. Preheat oven to 375°. Saute the spinach.

Pancetta Wrapped Stuffed Chicken

2. Put the chicken breasts in a sheet of plastic wrap and pound out until about 1/2 inch thick. Season lightly with salt and pepper. Place spinach and parmesan on top, then roll the chicken breast up.

Pancetta Wrapped Stuffed Chicken

3. Place in baking pan and wrap with slices of pancetta (or bacon). At this point I would normally secure the wraps with toothpicks, but alas, I had none. It worked out okay in the end, but if you have toothpicks, I'd use them.

Pancetta Wrapped Stuffed Chicken

4. Bake for 35 minutes and enjoy!

Pancetta Wrapped Stuffed Chicken

I'd almost finished eating before I remembered to take a picture of what it looks like inside. How pretty is that? 

This was a huge crowd pleaser. Even my very picky little sister enjoyed it (and said I should make it a regular thing)! If I didn't have this blog, I never would have made this dish. How's that for a great hobby

Hope everybody is having a wonderful Tuesday!

Tuesday, July 30, 2013

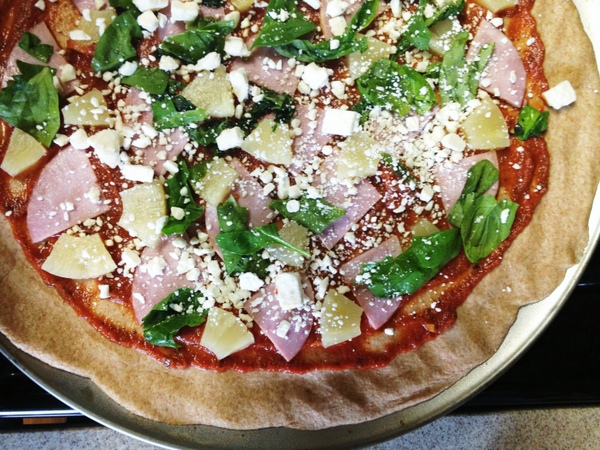
Better Than Hawaiian Pizza

Better Than Hawaiian Pizza

 I love pizza. It's a blank canvas for whatever sauce and toppings your little heart desires, and whatever flavor profiles you can dream up.

One of my favorites is the classic but delicious Canadian bacon and pineapple pizza, aka Hawaiian pizza. I wanted to come up with a "fancier" version, if you will, for our last pizza night, and here's the results:

Ingredients

pizza dough
and as much or as little as you want of these:
pizza sauce 
Canadian bacon
pineapple
spinach
feta cheese

Prepare your pizza dough, throw all the toppings on top, then pop it in the oven for about 15 minutes and enjoy.

Better Than Hawaiian Pizza

This is the first time I've used feta on a pizza and I must say, it's a winner. It doesn't melt, but rather gets a little bit toasted on top, and the flavor goes oh so well with the Canadian bacon and pineapple.

Better Than Hawaiian Pizza

 Did I mention I love pizza?

Thursday, July 25, 2013

Raisin Bar Cookies

Raisin Bar Cookies

 I recently received a few of my great-grandmother's recipes from my grandmother to try out. I knew I had to try her raisin bar cookie recipe first, because I haven't had them in years. I'm happy to say, this recipe turned out perfectly and they are just as delicious as they were when I was a kid. 

Raisin Bar Cookies
makes 24

2 cups water
1 cup raisins
1 stick margarine
1 tsp baking soda
1/2 tsp salt
1 tsp cinnamon
1 cup sugar
2 cups flour (I used my whole-wheat flour)

Boil the water and raisins until one cup of the liquid remains (this took about 10-15 minutes). Add the stick of margarine, then remove from heat. Once it cools to room temperature, transfer the mixture to a mixing bowl and add the baking soda, salt, cinnamon and sugar and mix until well combined. Then add half the flour, mix until well combined, and repeat with the other half of the flour. 

Raisin Bar Cookies

Grease a 9x12 cookie sheet, then spread the dough evenly in it. Bake at 350° for 20 minutes or until golden brown. Transfer the cookie sheet to a cooling rack, allow to cool for a few minutes, then turn the cookie out of the sheet and allow to finish cooling. Otherwise, the cookies will sweat and get sticky. Once cool, cut the cookie into 24 equal sized bars. 

Raisin Bar Cookies


Pour yourself a glass of milk and enjoy. These bars are just sweet enough to constitute a cookie, but the raisins and cinnamon give them a warm earthy flavor that almost makes them savory as well (which means it's totally fine to eat them for breakfast). Thanks, Grandma.

Raisin Bar Cookies

Tuesday, July 23, 2013

Pineapple Pork Chops

Pineapple Pork Chops


Guys, I'm really proud of this recipe. This is the very first recipe I came up with off the top of my head using just whatever I had around the house. Since its humble beginnings, it has become a family favorite. By that I mean it is my husband's favorite meal, and my sister always requests it whenever she visits. Today, I share it with you. 

Pineapple Pork Chops
makes 3-4

3-4 pork loin chops
1/2 cup flour
1 egg
1/2 cup Italian bread crumbs
1 Tbs olive oil
1 small can pineapple slices (4 slices)
3 Tbs brown sugar

Preheat oven to 350°. Heat up a pan with the olive oil. Coat the pork chops in the flour, then egg, then bread crumbs, and transfer to the pan. Fry the chops for about 1 minute on each side, then transfer to a baking dish (I usually line mine with aluminum foil to minimize cleanup). Place one pineapple slice on top of each chop. Mix together the juice from the can of pineapples with the brown sugar to create a glaze, then pour half of the mixture over the chops. 

Pineapple Pork Chops

Bake for 15 minutes, then pour the remaining mixture over the chops. Bake for another 15-20 minutes, or until the pork chops are no longer pink in the middle.

These are best served with this Panera mac and cheese copycat recipe and a nice glass of white wine. Enjoy!

Thursday, July 18, 2013

My 3 Favorite Smoothie Recipes

We recently bought a smoothie maker (this one, if you're curious) after reading about the health benefits of smoothies and wanting to add variety to the fruits and veggies we eat and how we eat them. Today I will share with you my 3 favorite smoothie recipes!

A Very Berry Smoothie

a handful each of blueberries, blackberries, raspberries and spinach
4-5 strawberries, tops removed
1 banana
1/2 cup fruit juice (I used a berry blend)
ice cubes

very berry smoothie

This smoothie is a good way to eat fruits, and to sneak in veggies. I hardly notice the spinach at all. 

Breakfast in a Smoothie

1 banana
4-5 strawberries (or other berry of your choosing)
1 cup oatmeal 
1 Tbs honey
1/2 cup orange juice
1 tsp cinnamon
ice cubes

breakfast in a smoothie

I make this smoothie for breakfast a few days a week. The oatmeal makes it more filling and the honey sweetens it up nicely.

Chocolate Peanut Butter Banana Smoothie

1 banana (105 cal)
2 Tbs peanut butter (210 cal)
2 Tbs chocolate syrup (100 cal)
1/2 cup milk (70 cal)
ice cubes

chocolate banana peanut butter smoothie

I make this one as an afternoon snack every once in awhile. At 485 calories, it's not the most low-calorie snack option (for example, a 2 pack of Twinkies is was 300 calories), but it tastes a lot fresher than most unhealthy snacks, it's filling, and it gives me an energy boost instead of a sugar crash.

I'm still experimenting, but these three are my go-to's right now. Hopefully I'll have more for you in the future!

Tuesday, July 16, 2013

Spicy Cajun Shrimp Pizza

Spicy Cajun Shrimp Pizza

This pizza is basically this recipe in pizza form. I had the extra bell pepper, Cajun seasoning, and shrimp leftover from it, so it just made sense to throw it all on top of a pizza, right? This was also my first time using the whole wheat flour in the pizza dough, and it was actually pretty darn tasty!

Spicy Cajun Shrimp Pizza

pizza dough (my recipe here, except this time I subbed whole wheat flour for regular)
1 red bell pepper, chopped
1 clove garlic, minced
1 tsp Cajun seasoning
1/2 jar marinara sauce
1 cup cocktail shrimp
olive oil

Preheat oven to 450°. Get your pizza dough ready (be it homemade or store bought).

Heat up a skillet with about a tablespoon of olive oil. Saute the bell pepper and garlic until it becomes fragrant, about 2 minutes.

Spicy Cajun Shrimp Pizza

 Once the dough is spread onto the pizza pan, sprinkle the Cajun seasoning on top of the dough and rub it in a little bit. Spread the marinara sauce. Then add the pepper, garlic, and shrimp.

Spicy Cajun Shrimp Pizza

 Bake for 10 minutes, then top it all off with cheese and bake for another 5-10 minutes.

Spicy Cajun Shrimp Pizza

Enjoy! This was one of our favorite pizzas to date.  Nom nom nom.

Thursday, July 11, 2013

Whole Wheat Cranberry Banana Nut Bread

Whole Wheat Cranberry Banana Nut Bread


 I know banana bread isn't groundbreaking or anything, but this is the first recipe where I used whole wheat flour in place of regular all-purpose flour, so I wanted to share the results. And besides, I had a few bananas that I had use that day because someone (*cough* the husband *cough*) accidentally broke the peel on all the bananas we had and they were going to go bad. But, I did add cranberries, because apparently I can't help adding cranberries to things.

Ingredients

1 1/4 cups whole wheat flour
1 teaspoon baking soda
1/2 teaspoon fine salt
2 large eggs, at room temperature
1/2 teaspoon pure vanilla extract
1 stick unsalted butter, at room temperature
1 cup sugar
3 very ripe bananas, peeled and mashed with a fork (about 1 cup)
1/2 cup toasted walnut pieces
1/2 cup dried cranberries

Combine the flour, baking soda and salt in a medium bowl and set aside. Whisk the eggs and vanilla together in a liquid measuring cup and set aside. Spray a 9x5x3-inch loaf pan with non-stick spray. Preheat the oven to 350°.

Cream the butter and sugar in a stand mixer fitted with the paddle attachment (or with a hand-held mixer) until light and fluffy. Gradually pour the egg mixture into the butter, while mixing, until incorporated. Add the bananas and remove the bowl from the mixer.

With a rubber spatula, mix in the flour mixture until just incorporated. Fold in the nuts and cranberries and pour the batter into the prepared pan. Bake until a toothpick inserted into the center of the bread comes out clean, about 1 hour. Cool the bread in the pan on a rack for 5 minutes. Turn the bread out of the pan and let cool completely on the rack. Devour at will.

Whole Wheat Cranberry Banana Nut Bread

I honestly could not tell that there was whole wheat flour in this instead of all-purpose, but maybe that's because I used it in a recipe where that wouldn't really make a difference. I'm trying it in my go-to chocolate chip cookie recipe next, that should be a pretty good judge as to how much it changes the flavor of things.

Either way, this bread was everything you want in a banana nut bread, and more! (You know, because of the cranberries.) I love how the nuts provide the crunch texture, juxtaposed with the cranberries which provide the chewy texture. This bread didn't last the rest of the day.

Whole Wheat Cranberry Banana Nut Bread

Tuesday, July 2, 2013

Cajun Campfire Packets (and S'mores)!

This past Sunday, we had a camping themed night for dinner, in honor of summer and 4th of July coming up and the general fact that we wish we could go camping but aren't quite ready to do that with a preschooler just yet. We couldn't even actually make the food over a fire-- no fire pits are allowed in base housing, which makes sense, because who wants to accidentally set an entire state on fire? But our campfire themed night was delicious nonetheless!


Cajun Campfire Packets, makes 4-5 servings
 adapted (barely) from here

3 cups cooked rice (white or brown)
2 cups cocktail (cooked) shrimp
2 small bell peppers (I used one red one green)
4 cloves garlic
1/4 cup olive oil
1 1/2 teaspoons Cajun spice
1 teaspoon cumin
1/2 teaspoon red pepper flakes
1 tablespoon cilantro
salt + pepper to taste 

Preheat oven to 350° (if cooking it in an oven, which is how I had to do it). Cook the rice according to the package directions. Chop the bell peppers into bite size pieces. Remove the shrimp tails. Mince the garlic. Combine all ingredients into a bowl and mix until well incorporated. If you're actually taking this camping, you can put it into ziplock bags to store in your cooler until you're ready to eat it. 


Fill a square of aluminum foil with a serving size amount of the mixture. Cut a small hole in the top. Place in the oven until hot (you may notice steam seeping out of the top cut-- mine took about 10 minutes). Be careful as you remove the foil.

Since this recipe made enough for double the amount of people that were eating it, I am freezing the leftovers to use again next week as a burrito filling and adding salsa!


Then for dessert, we had s'mores! I popped the marshmallows into the microwave for a few seconds, then topped it off with a Reeses peanut butter cup. Candy that isn't a slab of Hershey's on a s'more is by no means a new thing, but if you haven't tried it yet, you need to. It's amazing. 


(By the way, these packets totally count as real food if you use brown rice instead of white. I would have used brown, but like with my flour, I'm trying to use up the last bit of white rice I have in the pantry before switching to brown.) 

What's your favorite food to make/eat while camping?

Tuesday, June 18, 2013

Real Food Recipe: Bruschetta Salmon with Cheese Garlic Biscuits


 I've recently been making the effort to incorporate more "real" food into our diet: you know, less processed, more natural. So when I stumbled upon this blog, it was like being handed a stone tablet with the Real Food commandments written on it. There may even have been a heavenly chorus, I can't be sure.

So after reading all the rules and tips, I decided to try to come up with something that I know my family likes, but made with all (or at least mostly) real food. I think I hit my mark with this one.

My family loves salmon. Even the little loved it once we finally got her to try it. Plus I have an unhealthy obsession with bruschetta. And when you combine the two, you get a meal that is 100% "real food" approved. Bonus points for the fact that the salmon is wild-caught never-frozen from a local market, and the produce was from a farmer's market. 

Bruschetta Salmon
serves 2 (and a half)
  • 1 lb salmon (two half-pound fillets) (wild-caught preferred)
  • 2 ripe tomatoes (I used Roma)
  • 1 clove garlic, minced
  • 1/2 Tbsp extra virgin olive oil
  • 1/2 tsp balsamic vinegar
  • 1/2 tsp dried basil
  • 1/2 tsp oregano 
  • salt and pepper to taste

1. Preheat oven to 375°. Then prepare the bruschetta. Chop up the tomatoes and garlic, then mix everything together.


2. Next, put each fillet in a sheet of aluminum foil. Spoon half the bruschetta over each fillet, then wrap everything up in the foil and seal the packets closed, like so:


 3. Place the packets in the oven and set the timer to 30 minutes.

At this point, I prepared the biscuits. I used this recipe pretty much to a T except for the fact that I used regular all-purpose flour because I want to use all of it up before replacing it with the whole-wheat version. While the timer was running on the salmon, I was able to get these prepared and in the oven at the 19 minute mark, which ended up being perfect. I love it when everything gets done at the same time.


The salmon was juicy, and took on just a hint of the flavors from the bruschetta. And the recipe for the biscuits didn't lie: they reminded me of the ones from Red Lobster more than a little. The two together made for the perfect at-home seafood restaurant-inspired dinner, made with (almost) 100% real, unprocessed ingredients. Plus it got two thumbs up from my husband, so there's always that. 


Over the next few weeks, I will slowly be looking to replace the ingredients I currently use with more and more real food options, and any recipes I come up with that pass muster will be shared here. Just look for them under the "real food recipes" label!
Related Posts Plugin for WordPress, Blogger...